Step by step – How To Flash Stock ZUI rom (firmware) for Zuk Z2 Z2131
Since I have some experience flashing Lenovo Zuk Z2 Pro to stock ZUI rom. I decided I should share my knowledge and make a simple and easy to follow tutorial on how to flash your Zuk Z2 to stock rom. It will be my second Lenovo Zuk Z2 I will root so from experience I know this works. And my rooted device is working properly.

If you do not have any experience in rooting phones and never have done anything like this before. This tutorial is exactly for you. You will need:
- Lenovo Zuk Z2 Z2131 phone ( fully charged, at least 80%)
- A USB C cable that comes with a phone
- Windows computer with an available USB 2 port. (Do not use USB 3 ports)
- And some patience to follow this guide
Important. This tutorial is for Lenovo ZUK Z2 Z2131 Smartphone 4GB RAM, 64GB ROM. If you have ZUK Z2 Pro Z121 Lenovo ZUK Z2 Pro with 6GB RAM, 128GB you will need another ROM.
Software and downloads
First of all we will have to download some items.
First order is to download the stock Lenovo Rom for our Zuk Z2131. Download here.
For the purpose of this tutorial I will be using this Indian rom Indian Z2 Plus – QPST Official firmware ZUI_2.0.093_ST. I am using this rom for more then a month and is it completely stable.
Next we will download these files. Which we are going to use later on.
- ZUK_UsbDriver_1.0.5 – Download here
- minimal_adb_fastboot_v1.4.2 – Download here
- Miflash tool – Download here
Disabling Windows 10 driver vertification
This is important step. Without this it wont work so do not skip it. To Disable Driver Signature Verification on 64-Bit Windows 8 or 10.
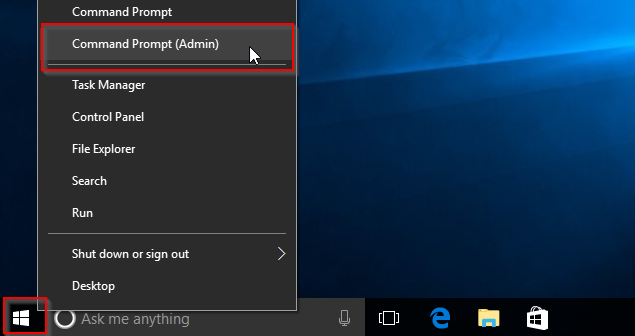
- Right click on Start button and the select Command Prompt (Admin)
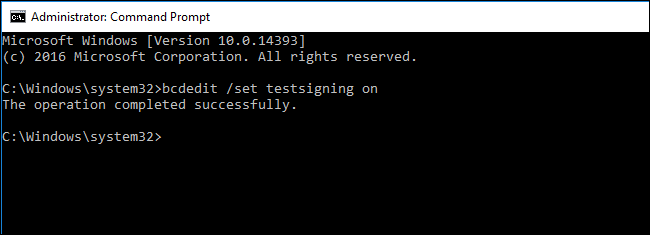
- Next type or paste this into the window:
bcdedit /set testsigning on
- If entered correctly you will see this message:
- Restart your computer and you will see this message.

- To turn off the testing mode simply repeat the steps and type:
bcdedit /set testsigning off
Installing
First of all we will install all necessary tools to get this process complete.
- ZUK_UsbDriver_1.0.5
- minimal_adb_fastboot_v1.4.2
- Miflash tool
- Extract the Rom you download to the root directory of your drive for example drive C
Turn your phone into flashing mode
- Enalbe Developer properties on your phone
- Enable USB debugging on your device
- Start Minimal ADB
- Follow the scree below:
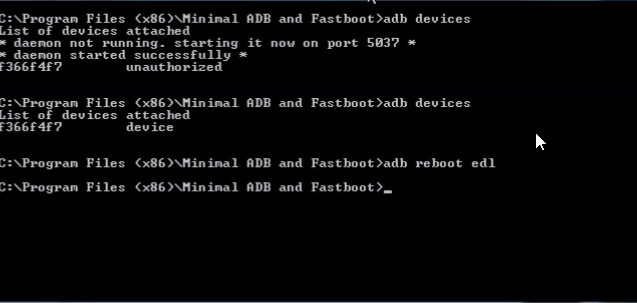
- Check if the device is enabled on Device Manager
Flash your phone
This is the final and important step. So tread carefully 🙂
- Open the Miflash tool and select the rom you downloaded and extracted to root directory.
- Select Flash all
- Click Flash
- Wait till it finishes and do not UNPLUG your phone.
- When it will be done hold the power button for the phone to start. Notice! It will take longer for the phone to start it is normal.
- Enjoy your


